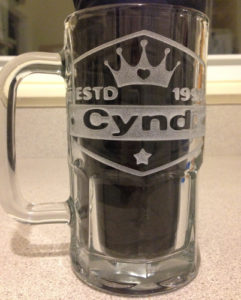
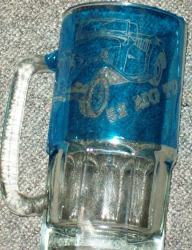
This time I decided to test how the glass would look after blasting a very course aluminum oxide abrasive- I believe it was around 30-50 grit in my pressure pot system.
Traditional Abrasive Grit Recommendation for Sandblasting Glass
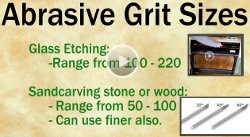
If you have been in the glass etching or sandcarving industry for a while, you may know that traditionally a finer abrasive is always recommended. Usually around 150-180 grit or even up to the finer 220 grit. This might be partially recommended because those ranges are typically needed when using the photoresist stencils, which many folks use.
In addition to that, other folks have always said finer abrasive was recommended because it looks better with its smoother finish.
Desiring a Smoother Etch or a Whiter Effect
In my honest opinion, the grit used may be a personal preference and dependent on what project is being worked on. So be sure to try a courser abrasive someday and let us know what you think. Just be sure to use a thicker stencil to hold up to a more course, aggressive abrasive.
When I decided to go off track from the typical recommendation and try a course grit a few years ago (I think at that time it might have been 70 grit), I realized my glass seemed to appear more noticeable and whiter. This may be due to the larger nicks at the glass, causing a larger light refraction. Also, I personally think the more rugged etching provides more character with its texture and more of a work of art than something that could be done with automated machines like an laser engraver. Plus, a course abrasive does a better job of carving deep into the glass in less time and the technique of carving deep into glass is what leaves sandblasting as one of the most desirable forms of etching.
Since the 70 grit appeared to produce visually whiter etchings, I recently decided to test out my more aggressive abrasive that I have been using for blasting rocks. Like I said, I can’t remember the exact grit I put in my system but I believe it was around 30-50 grit. The photos shown are the results from this experiment on a beer mug.
Downside to Using Extremely Course Abrasive Grit on Glass
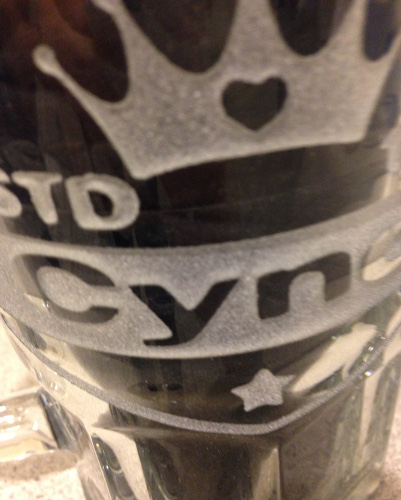
I believe this happened because:
- Primarily, this abrasive may just be too course for glass. Even though the stencil was protecting the edges, the large beating of the abrasive created jagged edges which doesn’t look too good.
- The air pressure may be too high for the large abrasive. I believe I used around 60psi. Turning down the air pressure may help prevent the edges being chipped away, but I am not certain it will make a prefect etched glass.
- The glass was carved too deep. Along with the previous point, you may be able to get a better etching with this course grit if it is blasted on the surface instead of penetrating deep in the glass because the more you sandblast, the higher the chance abrasive will nick the edges.
Conclusion?
With that said, using this extreme course of a grit, 30-50, may be too course for glass. Since rocks are porous and more crude, any little edges nicked won’t show up so it is okay. But a grit for glass, I am not sure I would recommend anything courser than 70 or 60 at most.
Those are my thoughts and just based on one recent etching with a course grit. So I would be thankful to hear your thoughts in the comment section below. What grit do you use for glass sandblasting? Have you experimented with courser grits and what was your results like?
Thank you everyone!
Share this on social media or email by clicking below!

Hey! My name is Jane Cook, and I am the Chief Scientist at the Corning Museum of Glass. It’s always great to see glass folks experimenting, trying to figure out new ways to do stuff, and asking “What if I did this thing that someone said not to do?”
I can offer a few suggestions of other things to try, based on a slightly deeper look at what happens in sand/grit blasting. Before joining the staff at the museum, I was a scientist at Corning for many years, and did research on optimizing grit blasting for some technical projects.
Blasting is essentially throwing millions on tiny rocks at your glass. How much damage each rock causes – how much of the glass gets broken and falls off – is related mostly to how much energy each of those rocks has when it hits the glass. And that depends on how much they weigh, how fast their moving, how directly they hit (straight on, or at more of an angle), and how much glass is hit (bigger rocks, more surface gets hit). Other things can matter as well, like how hard the grit is (silica sand vs silicon carbide, for example), how sharp or worn (from use) it is, and how much damage was done to the glass by the previous rocks.
In your work you’ve changed the grit size, which (if it’s also the same kind of “rock”) increases the weight of each rock and the area it hits. If you are also keeping the pressure and nozzle the same, and the “angle of attack”, then you are dialing up the energy based on size alone, and that will give one type increase in wear rate. But you could also change the pressure (speed) and the angle and see how that changes the look. And of course the same pressure and angle will give different results with glass beads than diamond dust. Lots of variables to play with – maybe too many!
I’d say that the larger grits you are using that give the whitish stand-out appearance that you like, might be coaxed into giving you cleaner edges with less mask erosion by backing on pressure of angle, or by doing a two- (or more) step approach starting with finer grit for a longer time, then finishing with a shorter burst of bigger rocks. I don’t know what the exact answer is, but I am confident that there are other routes to similar apprearences when you play with a larger set of tools in the blasting tool kit.
Would love to hear how this works out!
Jane
@ Jane, thanks for the comment! I am familiar with the Corning Museum of Glass and know they put some good materials together about sandblasting glass.
I agree, there are a lot of variations to experiment with and I hope to document these in the future.
That is a really good idea on starting with the fine grit and then blasting with the course grit! I may try that soon since I have 2 cabinets with a course and light grit. I appreciate the idea! Thank you
Feliz ano novo para todos ficou legal a gravação na caneca eu também já gravei algumas deste jeito
Ótimo trabalho parabéns.
Hi Eric,
I did do a fairly deep blast for a construction firm, by doing five passes with the nozzle at 30 psi with 200 grit as to protect the edge of lettering as they were quite thin. I could not find where to post a photo.
Regards Rex
@ Rex, I have done the same thing! Also, the comment area doesn’t currently have the ability to upload photos, but you can do so here https://www.glassetchingsecrets.com/submit/submit-etching.php and I can feature you.
That is a good idea in allow folks to upload their photos in the comment area though. I am going to look into how that can be done. Thank you!
Just wanted to share this comment I received from Janine:
I use 120 silica carbide the courser sand does not last, gets worn down very quickly. Also has too much static. Plus huge hassle to clean up entire walk in booth to use different grits.
That’s an interesting point. I thought I noticed this a little too, but it might have been because of a lower quality harbor freight abrasive I was using at the time. I am interested to hear if anyone else has had a similar experience.