Categories
Module 1

Stenciling Basics

Part 1: Stencil Placement, Using Tracing Paper & Design Books Tutorial

Part 2: Transferring & Cutting the Design Tutorial

[nonmember][This content page is protected for members only. You may view what it will cover below:]

[If you’re currently registered for this level, then you have to sign in to view it. Thank you!]
Nonmembers, please sign up to the: Member Sign Up here

Summary, shows the stencil placement on the glass, and the simple technique of using tracing paper & design books for a glass etching pattern.

Part 2 shows a step by step tutorial on how to transfer and cut the design.[/nonmember]

Categories
Module 1

Module 1 Sections

Module 1.1 talks about the basics of sandblasting and types of sandblasters.
Module 1.2 talks about the typical settings or standards for sandblasting.
The engraving part of module 1 talks gives some brief videos on the basics brought to us by corning museum of glass.

Categories
Module 1

Engraving

These are brief videos about rotary types & engraving techniques brought to you by the Corning Museum of Glass, Dremel Tool, & other members.

Brief explanation of engraving on glass with rotary tools.

Dremel Simple Tutorial

Polishing Techniques: Polish the Glass Engraving


Other Videos

Video presented by The Studio of The Corning Museum of Glass.

The Czech artist Jiří Harcuba shows how he engraves with diamond, stone, and copper wheels, creating innovative portraiture on glass with the highest level of craftsmanship. He talks about his life, his work, and his interest in philosophy and psychological studies of major figures. He also comments on some of the engraved and carved glass objects in the Museum’s collection.

[nonmember][This content page is protected for members only. You may view what it will cover below:]

[If you’re currently registered for this level, then you have to sign in to view it. Thank you!]
Nonmembers, please sign up to the: Member Sign Up here

Summary:
These are brief videos about rotary types engraving techniques brought to you by the Corning Museum of Glass.

Brief explanation of engraving on glass with rotary tools.

[/nonmember]

Categories
Module 1

Sandblaster Tips

I made this for one of my other sites about the different sandblasting tips.

Although I mentioned those inexpensive ceramic tips in the video, I don’t recommend them for sandblasting glass because we use a harder abrasive which will deteriorate them much quicker.

Categories
Module 1

Vinyl Cut Stencil Instructions

I decided to create this quick instructional guide to help assist those that got a free etching stencil from me. Its fairly simple but it should definitely help. When you receive them in the mail, they should look like this below. They have three layers of sheets. The top layer is a clear sheet which transfers the stencil. The middle layer is the actual stencil itself which is blue. The bottom layer is white and is just the backing paper which will get removed. Remember to clean the glass thoroughly even if it looks clean. Glass usually has oils from your hands on it so use something like rubbing alcohol to clean it.

A sample of one of the free glass etching stencils that I provide for people that refer to my site.

Follow the steps below:

  1. Remove the white backing paper from the other two layers. You do this by pulling the clear transfer sheet off and the blue stencil should be stuck to it. Make sure you pull it off slowly so that every stencil detail is sticking with the clear sheet. You need to pull it off 180 degrees as seen below. Getting the stencil ready for transferring.  Removing the backing paper.
  2. Place one edge of the stencil onto the glass or what ever object your using. You’ll have to line it up correctly by measuring it or you can eye ball it which I didn’t really do since this was just a sample. Positioning the stencil on the glass for etching.
  3. Now smoothly squeegee the stencil onto the glass making sure there are no air bubbles. If you don’t have a plastic squeegee, you can use a lot of different things such as cardboard. If its a small stencil like this one, you can also use your finger if you want. Make sure it is firmly placed onto the glass, especially paying attention to the edges so that your etching cream or sandblasting media doesn’t get under the stencil.Using a squeegee to place the stencil on glass.
  4. Remove the transfer sheet by pulling it off 180 degrees and make sure that none of the stencil comes up with it. If the stencil starts to come off, place the transfer back the other way and try again at 180 degrees. Finish applying the stencil and removing the transfer paper.
  5. Then all you do is mask off the outside areas of the stencil and etch the exposed areas. I made a tutorial that shows you how to etch glass if you need further guidance.

My last suggestions is to run hot water over the stencil after you have etched the glass. This will make the stencil come off very easy.

[nonmember]Some basic instructions to use for placing a vinyl cut stencil. Shows the steps in order:

  • Applying the transfer sheet
  • Removing the backing paper
  • Aligning the stencul onto the glass
  • Using  a squeegee
  • And peeling off the transfer sheet

[/nonmember]

Categories
Module 1

Video of Etching Cream Vs. Sandblasting

As I have stated a lots of times here, there are many ways to create etched glass. But instead of having me ramble on about it, I thought I would show you a video I made. This doesn’t show you all the ways though. It only shows the sandblasting and cream etching technique.

It first goes into sandblasting glass with the variable sandblast nozzle that I made which is similar to the PAB blaster used for artistic etching. Then for the second part, I show you the etching cream method which only takes a few etching supplies such as an exacto knife, a brush, and the cream.

I am not the greatest with making videos, but at least you can get the point. I might be getting better though :) . I’ll be working on trying to figure out how to make better videos here soon and let everyone know about it for stuff like sandcarving. Okay, I hope the video helps and please leave me comments or questions about it.

[nonmember]
The video shows the various processes of sandblast etching and cream etching. These are basic video tutorials of how to etch or sandcarve glass. Sorry if these don’t go in very much depth. Our premium videos go more in detail about this. If you have any questions about cream or sandcarve etchings, feel free to shoot me an email. See the video below:
[/nonmember]

Categories
Module 1

Etching Wine Bottle Tutorial

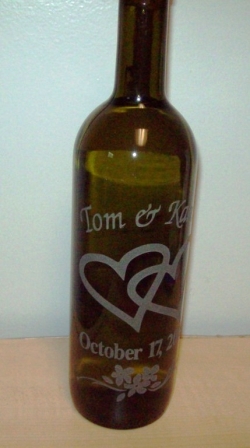
An etched glass wine bottle personalized for a wedding gift.

Personalizing a glass wine bottle can be a great gift for a wedding, anniversary, birthday, or special holiday. And one way to personalize the wine bottle is to etch it and below I show you a the steps it tales to create one with photos to follow along. If you already know the basics of etching glass, then its really the idea that counts so give it a try.

First, pick up a good bottle of wine and remove the front label. The labels are usually hard to remove, so you can try to soak it in water for a while. I use a razor blade to scrap the paper label off and then rub off the glue residue with lacquer thinner and a rag.
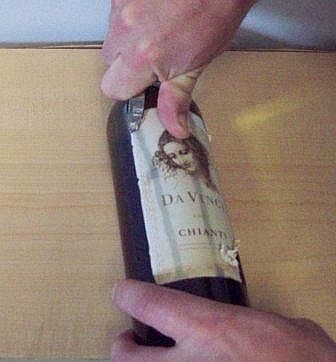
Preparing the glass by removing the label.

For the second step, I place the vinyl sheet or contact paper around the front of the bottle.
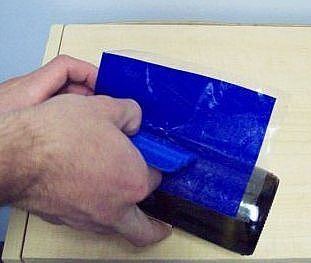
Applying the stencil to the wine bottle.

Third, draw or trace a white and black stencil design onto the vinyl sheet. Try to make it level as much as possible. There are some ways to do this by measuring. After the pattern is traced, cut out the areas that you want etched. This is usually best done with a exacto knife.
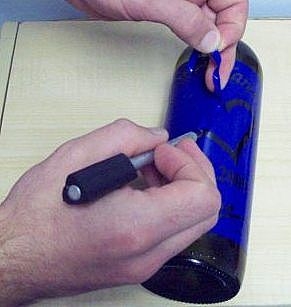
Weeding the stencil and preparing for etching.

Fourth, mask off the outer areas of the stencil. This will prevent any areas that you don’t want etched to be exposed to the etching cream or sandblast.
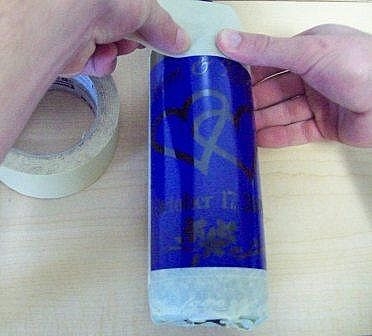
Masking the wine bottle and preparation for glass etching.

Fifth, once ready, chose the sandblast glass etching, cream etching, or engraving method. For this example, I used the sandblasting method which will lightly chip the surface of the glass. All you do is blast over the exposed areas of the stencil evenly.
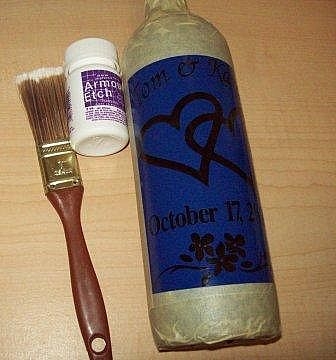
For this step, you chose a etching method and begin marking the wine bottle.

Sixth, wipe off and wash any reside. Then peel the vinyl resist off by using a exacto knife to assist.
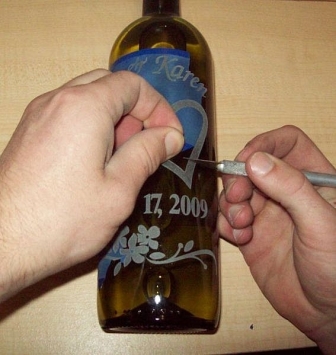
Removing and cleaning the stencil off the wine bottle

That’s all there is too it. Then just give away the etched glass gift for your occasion.

[nonmember][This content page is protected for members only. You may view what it will cover below:]

[If you’re currently registered for this level, then you have to sign in to view it. Thank you!]
Nonmembers, please sign up to the: Member Sign Up here

A step by step tutorial of me sandblasting a wine bottle glass for a gift. These can be great for personalized wedding gifts, bachelar party gifts, birthday gifts, and anniversary gifts. Learn more inside and etch like a pro![/nonmember]
Categories
Module 1

PhotoResist Blow Out Solutions

Often times people have problems with there photoresist stencil blowing off while sandblasting. This is a fairly common problem the arises. It doesn’t seem to happen as much with a regular vinyl stencil but does every once in awhile.

A fellow glass sandblaster, named John, emailed me about this problem and here is my response with a bullet list of rules and actions to consider.

  1. Use a Finer Abrasive Grit: There could be a few things to consider, but the one that comes to mind is that the grit being used is too large. I personally use about 150 or 180 grit. I probably wouldn’t use anything larger in size than 100 grit (but my grit standards are set at least 120 and finer). Sometimes they don’t emphasis this enough, but the finer the grit is, the less blow off problems you will usually have and the thinner the vinyl stencil can be. I talked about that in the ebook a little bit also. Alot of times, I will actually do some sandcarving with a 3 mil vinyl with a fine grit. Works fairly nice. By the way here is some more steps to follow for glass sandcarving.
  2. Ensure a Clean Surface: Another problem could be due to having a unclean surface. Even if the glass appears to look very clean, it still has oils and such from peoples hands. You can wipe the glass down with a cleaner such as rubbing alcohol.
  3. Dry Out the Resist, but not to Dry: A third, is to make sure that the photoresist is dry but not bone dry. I use the photoresist that doesn’t require an application of adhesive. Its most tacky when it is almost dry. If the photoresist still has moisture absorbed, then the photoresist won’t adhere very well.
  4. Lower the Air Pressure: A fourth rule, is to make sure the sandblasting pressure isn’t set at too high of a pressure. The photoresist company will usually have a recommended and maximum pressure that can be used for each specific photoreist thickness. Then it will also go back to the first rule I stated. If a larger grit is used, you may have to back off the pressure too.

[nonmember]Solutions to fix photo resist blowout problems. I talk about ensuring a clean surface, letting the resist dry enough, using the correct size grit, and the proper pressure setting.[/nonmember]

Categories
Module 1

Old 2 Stage Sandcarving Tutorial

Here are some basic steps to sandcarving glass with a two stage sandcarving method. It is just one way to etch glass. You can see some of the popular ways by going to the main glass etching page. If you have read my ebook or read through the site, it discusses this as the major reason to use a pressure pot sandblaster.

Through a series of sandblasting stages, you can carve a 3 dimensional shape into the glass. This is very basic and can get more advanced. If you would like to know more about the advanced ways, please leave a comment below.

So here are the basic steps to sandcarve glass with a sandblaster. It is a simple 2 stage sandcarving.

First, place your stencil on the glass and cut out the pattern with a knife by following the lines. This example is with a flower that you can download for free at the glass etching pattern page. You will need to observe the stencil design. As you can see, I marked areas of the cut stencil with numbers. the number 1 means its the first blasting and the deepest to be carved. The number 2 means its the second blasting and is a light etch. Remove the number one areas of the stencil or the areas that would be closer to the observer when looking at. The picture below shows the first sandcarving stage ready to be blasted:

First stage ready to be sandblasted.

Below is a picture of the first stage deeply sandcarved with a pressure pot sandblaster:

1st stage done

After you have sandcarved the glass deep, then you can begin peeling back the stencil for the number 2 stage. Remember, you can mark the areas with a sharpe marker like I did. I marked the stencil areas with the number 2. As you can see, I pulled the areas and its ready to be lightly sandblasted below:

Weeding vinyl stage two

Then, for the final step after the second stage was lightly etched you can remove the stencil resist and clean up. Since I did a reverse etching which is the best way to sandcarve glass, you will need to flip the piece around as shown below:

Here is the final glass carving with some light

If you liked this simple sandcarving, please bookmark this page with the buttons below. I will have more for you soon.

Update: Some people have been having problems with photo resists and stencils coming off so I made a post about fixing photoresist blowout problems. I hope these tips will help. Feedback would be great, just leave me a comment!

Categories
Module 1

PAB Blaster Videos

Part 1:

Part 2:

pab blasterThis page just shows some videos that I collected which shows you an idea of how the PAB blaster works which can be made fairly easy with some mechanical skills in my instructions here: https://www.glassetchingsecrets.com/member/make-a-variable-pressure-nozzle/

That page explains more about what the PAB Blaster is and how you can make a PAB blaster yourself. They can actually be made one for less than 20 dollars when the PAB blaster sells for about $200. The price is steep but it is useful, so check out my alternative ways to easily make one from materials you can find all over.

Be sure to also check out my new foot switch design which works in a similar manner as the PAB except it is controlled by your foot instead so it is easier to use. See the video of the foot switch nozzle here and watch the video.