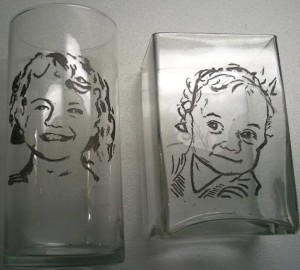
1. I first took the photo of my granddaughters sent to me from my daughter via Gmail and downloaded them into Adobe Photo Shop.
2. Once I did that, I selected Filter, selected Sketch and then clicked on Photo Copy to get the photo close to what you see.
3. I then adjusted the Detail and Darkness to get it to the final image.
4. I then reduced the sizes of each piece to fit the glass vases and printed them.
5. Using rubber cement, I attach the images to the INSIDE of the vases. (Be careful not to use too thick of glass due to the fact it could distort your position while cutting).
6. Once positioned, I took my Micro-Pro by Mastercarver and used a round fine tip diamond head bur to outline and cut the finer lines.
7. Once that was done, I went back over the wider lines with a coned shaped fine sanding stone to smooth it all out.
8. After finishing sanding, I used Rub and Buff to make it all pop. It was my second attempt at engraving and had a blast doing it.
I plan on continuing to do faces of family and improving my craft, eventually go out into the market to sell.
Share this on social media or email by clicking below!


It looks great love it I need to try that Thank you
Looks good. I have stayed away from doing this because I thought it was a lot if trouble. Now with the way you explained this I need to try your method soon. Thanks for sharing.
Eric, would you consider sharing your sandblasting technique to accomplish the same outcome?.
Perhaps a link to what you’ve shared in the past. I think Kevin’s technique is great, but I hesitate to invest in additional equipment/applications. Guess I’m just a true-blue sandblaster!!
This is really great-looking pieces. Would like to try engraving images similar to your sketches. You mentioned using a Micro-Pro by Mastercarver. Assuming this is a high speed rotary engraving tool? Do you find this fast enough to engrave glass as well as wood? You did a really nice job. Thanks for sharing!
David, the max speed of the Micro-Pro is 50000 rpm which is plenty of speed for the jobs that I do. I do wood as well and find that it works great. If you would like to see examples, let me know and I will be happy to shoe them to you.
Thanks for your interest!
@Nadina, you would simply just create a stencil version of that design by cutting in out or using a photoresist. Then sandblast over it.
I love what you did and would like to try it. My question is you said that you used rubber cement to attach the photo copy to the inside of the glass. Since I don’t remember ever using rubber cement, does this come off when you are done?
Very nice, I was wondering how you’d do that.
@sandy p,
Kevin tried to reply but did it via the email notification he got. He stated the below:
Yes it will. I only used what was needed to hold it on which wasn’t a lot. You can also just tape it on
Great I will have to work up the courage to try this. Can I contact you if I have any other questions? If not that is cool too. Your work is fabulous.
re microcarver……I bought 1 a few years back $300 cdn, one of the things I carve are emu and ostrich eggs.(dental drill)..this sucker has a tiny bit , I get old bits from dental office..free.Spins approx 100 times faster than a drummel.
Also bought a dental blaster, they use to remove plaque from teeth at the gums….like a badger..but more expensive and capable of great shading, very minute detail,